EMU examples
Note: The SimpleUI and iBeamSmart plugins are now distributed with EMU in Micro-Manager 2-gamma. Therefore they are no longer maintained here. For the latest source code, refer to the EMU repository.
This repository contains examples of EMU plugins:
-
Base plugin: An empty plugin with comments within each method, explaining what needs to be implemented. Can be used as basis for a new project.
-
BMC-example: The plugin built from the code snippets from the BMC publication.
-
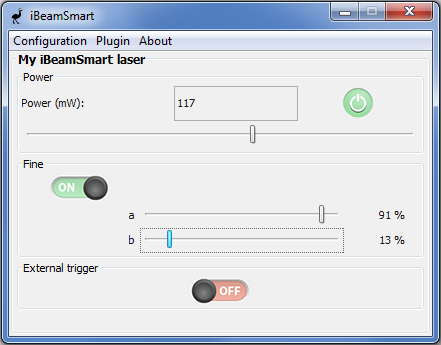
iBeamSmart: A simple UI controlling a single iBeamSmart laser (Toptica), including on/off, power percentage, fine percentages and external trigger.
-
Simple UI: A UI similar to the example developed in the EMU tutorial, albeit with optional scaling of laser power (mW) to laser percentage (%).
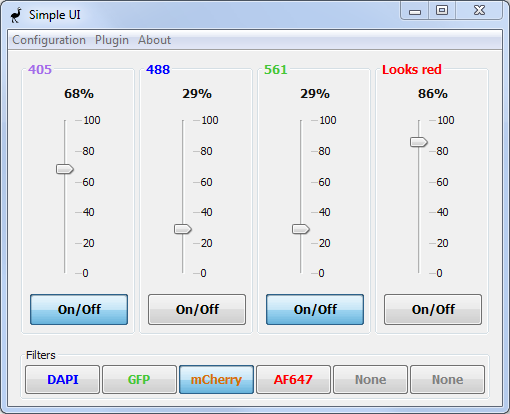
Note that all colors and names of the lasers and filters are configurable through the EMU interface and can therefore be changed easily.
Installation
-
Follow the installation steps for EMU
-
Using the console, go to the folder you wish to install EMU-examples in and type (omitting the $):
$ git clone https://github.com/jdeschamps/EMU-guide.git -
Finally, compile all the examples using Maven
$ cd emu-guide/examples $ mvn clean install -
Then for each example, copy the .jar file generated in the example-name\target\ folder to C:\Path\To\Micro-Manager2gamma\EMU\. e.g.: “emu-examples/ibeamsmart/target/ibeamsmart-1.0.jar”.
-
Start Micro-Manager and select Plugins->Interface->EMU.
Base plugin as a starting project
- Copy the “baseplugin/src” folder in your own project folder.
- In Eclipse, create a new Java project and uncheck “use default location”. Choose your project folder. Make sure Java 1.8 or 8 is selected. Click next.
- Verify that the source folder is “src/main/java”. In the Libraries tab, add an external JAR and navigate to the emu jar present in your Micro-Manager folder (“Micro-Manager/mmplugins/” if EMU was correctly installed). Then, click on finish.
- You can then rename the package to match your institution, name and project name, as well as renaming the different classes.
Note: When you change the name of the packages and of BasePlugin.java, you will need to change the path in the “src/main/resources/META-INF/services/de.embl.rieslab.emu.plugin.UIPlugin” file accordingly (the file name itself should NOT change) to point to your own implementation of UIPlugin.