EMU tutorial: building a UI
This tutorial is a simple example walk-through of how to build a plugin for EMU, in order to obtain a re-configurable user interface within Micro-Manager.
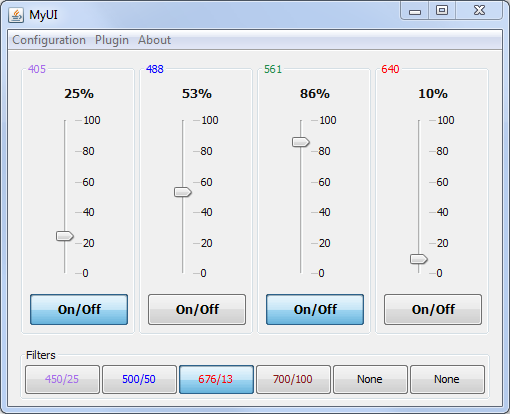
Here is a preview of the UI:
Prerequisite
- Eclipse with the WindowBuilder+SwingDesigner plugin running java 8.
- Micro-Manager 2.0.0 installed.
If the WindowBuilder and SwingDesigner are not installed, you will have to go to Help -> Install New Software and using “All available sites”, search and install “WindowBuilder Java Core” and “WindowBuilder Swing Designer”.
During the tutorial
- You can consult the guide for more in-depth details.
- The JComponents page of the guide has code snippets to help creating/modifying Swing JComponents. These are useful when implementing methods related to the UIProperties and the UIParameters.
- The source code can be found in the “src” folder.
A - Making sure that eclipse runs java 8
1) In Eclipse, go to “Window -> Preferences -> Java -> Installed JREs” and make sure that java 1.8 or 8 is known and is the default.
B - Setting up the eclipse projects
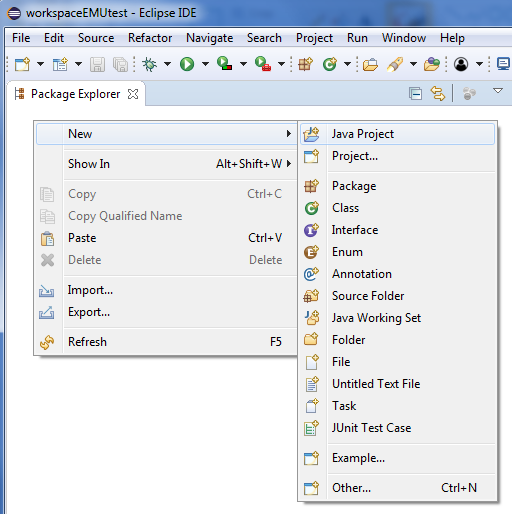
2) Create your own project: in the “Package Explorer” window, right-click and create a new “Java Project”.
3) In the pop-up window, set the name of your project (e.g. “MyUI”). Make sure that Java 8 (or 1.8) is selected in the JRE section. Click next.
4) In the “Librairies” tab, select “Modulepath” and then click on “Add External JARs” and navigate to your Micro-Manager folder and then to the “mmplugins” subfolder. Select the EMU jar (EMU.jar). Click again on “Add External JARs”, this time navigate to the “plugins\Micro-Manager” folder in Micro-Manager and select all .jar. Click finish.
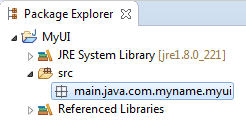
5) Right click on the project and create a new “package”. By convention, the folder tree should be “src/main/java/” and followed by reverse domain name. e.g. com/myname/myui. Therefore, enter “main.java.com.myname.myui”. You should then see:
Right-click on the project and select “Properties”. In Java Build Path and the Source tab, select MyUI/src and remove it from the source. Then click on “Add Folder” and tick the java folder in the tree and OK.
C - Setting up the laser panel: ConfigurablePanel
In this section, we will encounter the first EMU class: ConfigurablePanel. ConfigurablePanels are the building blocks of an EMU UI. The important steps before building a ConfigurablePanel are:
- What properties should be modified by the panel? (e.g. a laser on/off)
- What will the panel look like? (what JComponents, in which order)
- What configurable parameters do we want? (title, title color, names…etc…)
In our case, here we want:
-
UIProperties: laser on/off (TwoStateUIProperty) and laser power percentage (UIProperty, although better would be to use a RescaledUIProperty).
-
JComponents: a JToggleButton for on/off and a JSlider to set the power percentage.
-
UIParameters: name and color of the laser.
6) Right click on your package (here “com.myname.myui”) and select “new -> other”. In the pop-up, select “WindowBuilder/Swing Designer/JPanel”. Click next.
Note: If WindowBuilder or Swing Designer do not appear, then refer to the prerequisite section and follow the link to install the WindowBuilder.
7) Name the JPanel, e.g. “LaserPanel”. In the “superclass” section, click on “Browse” and search for “ConfigurablePanel”. Click finish. The LaserPanel should now appear in the package explorer.
Note: If ConfigurablePanel does not appear, then EMU was not properly imported (refer to 4).
8) Delete the LaserPanel() constructor (just the method, not the class), your “LaserPanel.java” should then look like the following:
package com.myname.myui;

import javax.swing.JPanel;
import de.embl.rieslab.emu.ui.ConfigurablePanel;

public class LaserPanel extends ConfigurablePanel {

}
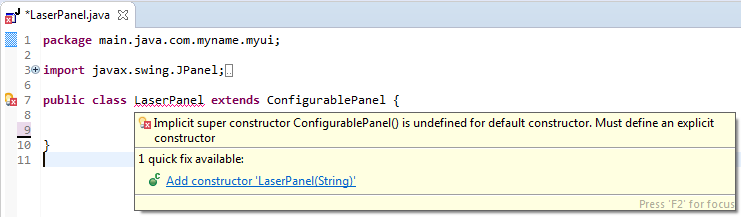
9) Place your cursor on the “LaserPanel” class name and select “Add constructor”:
Note: If Eclipse does not suggest anything when the mouse is placed on the error, then look at the preferences in “Window/Preferences” in the section “Java/Editor/ContentAssist”.
Eclipse should generate a new Constructor with a String parameter. This parameter will ultimately be the name of the ConfigurablePanel.
10) The class name should still show an error. Place the cursor on the class name again, and select “Add unimplemented methods”.
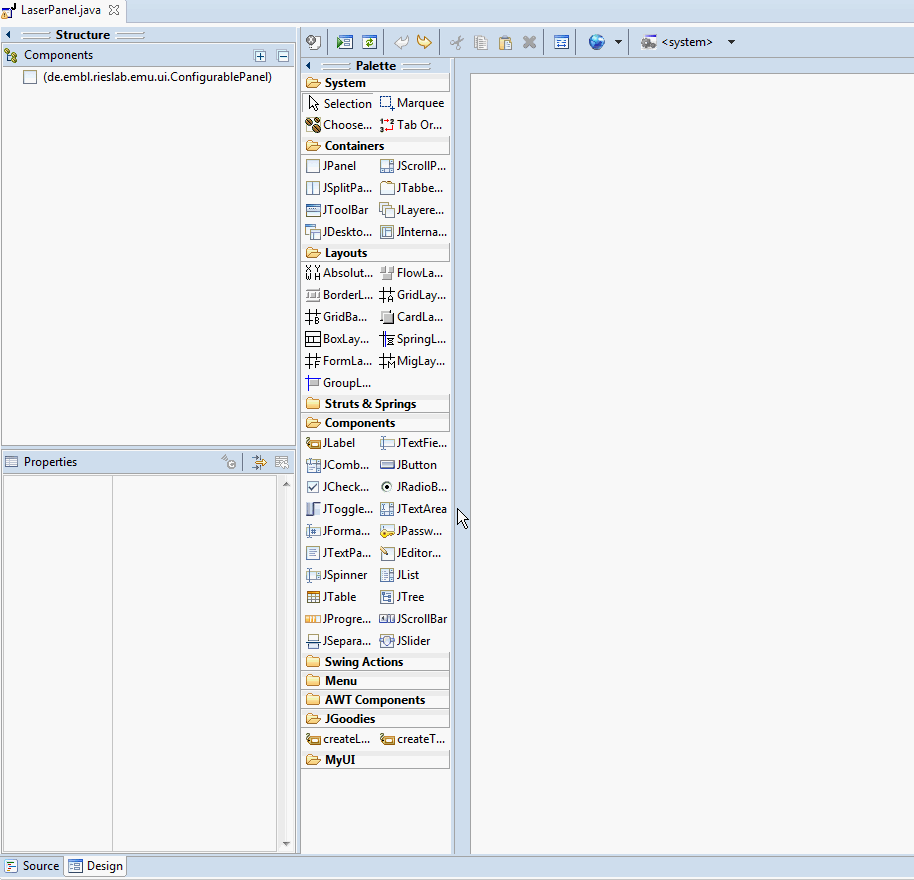
11) In the bottom of the Java editor, a tab allows you to visit the WindowBuilder designer. Click on “design”.
12) We are now going to use the drag and drop tools to build the laser panel. Here is an animated gif of the different steps:
-
In the Layouts section of the Palette, select “AbsoluteLayout” and click on the panel.
-
Click on the panel, in the Properties, select border and, in the pop-up window, choose “TitledBorder”. Enter the title and choose the left justification.
-
Place a JLabel (from the palette). Enter a placeholder text (such as “70%”). In the Properties, choose a CENTER horizontalAlignment. Click on the font property, increase the font to 12 and make it bold.
-
Place a JSlider on the panel. In the Properties, choose a VERTICAL orientation. Then check paintLabels and paintTicks. Finally sets the majorTickSpacing to 20 (note that the minimum is 0 and the maximum 100).
-
Place a JToggleButton at the bottom of the panel and enter its text (e.g.: “On/Off”). Resize the font as previously.
-
Resize all three components and the panel to make it look aesthetically pleasant.
13) For each component (JLabel, JSlider and JToggleButton), right click on it in the Structure tab and select “Expose component”. Select protected and click OK.
14) We will now implement the empty methods created earlier. Go back to the java editor by clicking on the Source tab.
15) The method getDescription() returns a String describing the what the panel is intended for. Replace the “null” in the return statement:
@Override
public String getDescription() {
	return "Panel controlling the power percentage and operation of a single laser.";
}
16) Let’s create the two properties. First we create two variables for the property names (LASER_PERCENTAGE and LASER_OPERATION):
public class LaserPanel extends ConfigurablePanel {
	private JLabel label_1;
	private JSlider slider;
	private JToggleButton tglbtnOnoff;

	//////// Properties
	public final String LASER_PERCENTAGE = "power percentage";
	public final String LASER_OPERATION = "enable";

	[...]
Then in the initializeProperties() method, we declare the two properties:
@Override
protected void initializeProperties() {
	String text1 = "Property changing the power percentage of the laser.";
	String text2 = "Property turning the laser on/off.";
	String propertyPercentage = getPanelLabel() + " " + LASER_PERCENTAGE;
	String propertyOperation = getPanelLabel() + " " + LASER_OPERATION;

	addUIProperty(new UIProperty(this, propertyPercentage, text1, new NoFlag()));
	addUIProperty(new TwoStateUIProperty(this, propertyOperation, text2, new NoFlag()));
}
Use again Eclipse suggestions to import the UIProperty, TwoStateUIProperty and NoFlag classes.
17) Now that the UIProperties have been declared, let’s implement the effect of the user interactions with the components on the properties. We are going to use static methods made available by EMU. In the addComponentListeners() method:
@Override
protected void addComponentListeners() {
	String propertyName1 = getPanelLabel() + " " + LASER_PERCENTAGE;
	String propertyName2 = getPanelLabel() + " " + LASER_OPERATION;

	SwingUIListeners.addActionListenerOnIntegerValue(this, propertyName1, slider,
                                                     label_1, "", "%");

	try {
		SwingUIListeners.addActionListenerToTwoState(this, propertyName2, tglbtnOnoff);
	} catch (IncorrectUIPropertyTypeException e) {
		e.printStackTrace();
	}
}
As done previously, use the Eclipse suggestions to import the missing class. SwingUIListeners offers a bunch of methods to simplify writing the action listeners in EMU. The first method takes the value of JSlider and sets the value of the UIProperty. In addition, it also change the text of the JLabel (adding an empty String to the beginning of the text and “%” to the end, as specified in the method’s call). The second method expects a TwoStateUIProperty (hence the try/catch clause). When the JToggleButton is selected, the TwoStateUIProperty will be set to its on state and inversely when the JToggleButton is unselected.
18) The last step that concerns the properties is to define what happens when a UIProperty changes. Let’s move to the propertyhasChanged(…) method:
@Override
protected void propertyhasChanged(String propertyName, String newvalue) {
	String propertyName1 = getPanelLabel() + " " + LASER_PERCENTAGE;
	String propertyName2 = getPanelLabel() + " " + LASER_OPERATION;

	if (propertyName1.equals(propertyName)) {
		if (EmuUtils.isNumeric(newvalue)) {
			int val = (int) Double.parseDouble(newvalue);

			if (val >= 0 && val <= 100) {
				slider.setValue(val);
				label_1.setText(String.valueOf(val) + "%");
			}
		}
	} else if (propertyName2.equals(propertyName)) {
		try {
			String onValue = ((TwoStateUIProperty) getUIProperty(propertyName2))
                .getOnStateValue();
			tglbtnOnoff.setSelected(newvalue.equals(onValue));
		} catch (UnknownUIPropertyException e) {
			e.printStackTrace();
		}
    }
}
Here, we first check which property has changed. If the percentage property has changed, we make sure that the String represents a number, then we round it up to an Integer. If the value is a percentage, we update the JSlider and the JLabel. If the propery is the laser on/off, we retrieve the “ON state” of the TwoStateUIProperty (which, depending on the laser, can be “enable” or “1” or “on”). Then depending on whether the new value corresponds to the “ON state” or not, we update the JToggleButton.
Now that the UIProperties have been tackled, let’s turn our attention to the UIParameters.
19) We want two UIParameters: the panel title (TitledBorder’s title) and its color. As for the properties, let’s define some variables:
public class LaserPanel extends ConfigurablePanel {
	private JLabel label_1;
	private JSlider slider;
	private JToggleButton tglbtnOnoff;

	//////// Parameters
	public final String PARAM_TITLE = "Name";
	public final String PARAM_COLOR = "Color";

    [...]
Then in initializeParameters(), we declare the UIParameters:
@Override
protected void initializeParameters() {
	addUIParameter(new StringUIParameter(this, PARAM_TITLE, "Panel title.",
                                         getPanelLabel()));
	addUIParameter(new ColorUIParameter(this, PARAM_COLOR, "Laser color.", Color.black));
}
Import the missing classes using Eclipse suggestions. We declared two parameters: a String for the name and a Color. Both UIParameters require a default value: we use here the ConfigurablePanel label (using the getPanelLabel() method) and the black color (Color.black).
20) Let’s now define what happens when the UIParameters change. This happens when starting EMU or modifying the configuration.
@Override
protected void parameterhasChanged(String parameterName) {
	if (PARAM_TITLE.equals(parameterName)) {
		try {
			((TitledBorder) this.getBorder())
                	.setTitle(getStringUIParameterValue(PARAM_TITLE));
			this.repaint();
		} catch (UnknownUIParameterException e) {
			e.printStackTrace();
        }
    } else if (PARAM_COLOR.equals(parameterName)) {
		try {
			((TitledBorder) this.getBorder())
               	.setTitleColor(getColorUIParameterValue(PARAM_COLOR));
			this.repaint();
		} catch (IncorrectUIParameterTypeException | UnknownUIParameterException e) {
			e.printStackTrace();
		}
	}
}
In both cases, we retrieve the TitledBorder of the panel. We then change either its title or its color. The try/catch clauses are here in case the parameterName is wrong or of the wrong type (String or Color).
We have now a fully functional EMU ConfigurablePanel with two UIProperties and two UIParameters.
D - Setting up the filters panel
This time we want:
- UIProperties: filter wheel position (with value 1 to 6).
- JComponents: a ButtonGroup with six JToggleButtons (button group means only one button can be selected at a time, just like in a filter wheel).
- UIParameters: name and color of the six filters.
21) Repeat steps 6 to 10, albeit with a “FiltersPanel” class.
22) Design the ConfigurablePanel:

- In the Layouts section of the Palette, select “GridLayout” and click on the panel.
- Click on the panel, in the Properties, select border and, in the pop-up window, choose “TitledBorder”. Enter the title and choose the left justification.
- Place a JToggleButton (from the palette) on the panel. Enter a placeholder text (such as “Filter 1”).
- Repeat by adding JToggleButtons on the right of the panel (up to 6).
- Select all JToggleButtons in the Components section, and show advanced properties in the Properties section (upper right button in the same section). Go to margin, set the left and right margin to 2 pixels (so that longer filter names are not cut).
- With all the JToggleButtons still selected, right-click on them and set a new standard ButtonGroup (Set button group / new standard).
- Finally, right-click again and expose the components as protected elements.
- Resize the panel to make it look aesthetically pleasant.
23) Back to the “Source” tab, let’s now create the UIProperties and UIParameters. First, let’s declare some variables:
public class FiltersPanel extends ConfigurablePanel {

	// generated by Eclipse WindowBuilder
	private final ButtonGroup buttonGroup = new ButtonGroup();
	private JToggleButton tglbtnFilter;
	private JToggleButton tglbtnFilter_2;
	private JToggleButton tglbtnFilter_1;
	private JToggleButton tglbtnFilter_5;
	private JToggleButton tglbtnFilter_4;
	private JToggleButton tglbtnFilter_3;

	//////// Properties
	public final String FW_POSITION = "Filterwheel position";

	//////// Parameters
	public final String PARAM_NAMES = "Filter names";
	public final String PARAM_COLORS = "Filter colors";

	//////// Initial parameter
	public final int NUM_POS = 6;

    [...]
We declare a MultiStateUIProperty with 6 positions (one per filter):
@Override
protected void initializeProperties() {
	String description = "Filter wheel position property.";
	addUIProperty(new MultiStateUIProperty(this, FW_POSITION, description, new NoFlag(),
                                           NUM_POS));
}
Such UIProperty can only take one of those 6 positions. We also define what happens when the MultiStateUIProperty changes:
@Override
protected void propertyhasChanged(String propertyName, String newvalue) {
	if(FW_POSITION.equals(propertyName)){
		int pos;
		try {
			pos = ((MultiStateUIProperty)getUIProperty(FW_POSITION)).getStateIndex(newvalue);

			switch (pos) {
			case 0:
				tglbtnFilter.setSelected(true);
			case 1:
				tglbtnFilter_1.setSelected(true);
			case 2:
				tglbtnFilter_2.setSelected(true);
			case 3:
				tglbtnFilter_3.setSelected(true);
			case 4:
				tglbtnFilter_4.setSelected(true);
			case 5:
				tglbtnFilter_5.setSelected(true);
			}
		} catch (UnknownUIPropertyException e) {
			e.printStackTrace();
		}
	}
}
We define two UIParameters (names and colors) that we expect to be comma separated names and colors of the filters:
@Override
protected void initializeParameters() {
	String names = "None";
	String colors = "gray";
	for (int i = 0; i < NUM_POS - 1; i++) {
		names += "," + "None";
		colors += "," + "gray";
	}

	String helpNames = "Comma separated filter names, e.g.:"
        +"\"name1,name2,name3,name4,None,None\".";
	String helpColors = "Comma separated filter colors, e.g: "
        +"\"blue,dark red, dark green,orange,gray,gray\".";

	addUIParameter(new StringUIParameter(this, PARAM_NAMES, helpNames, names));
	addUIParameter(new StringUIParameter(this, PARAM_COLORS, helpColors, colors));
}
And what happens when they change:
@Override
protected void parameterhasChanged(String parameter) {
	if(PARAM_NAMES.equals(parameter)){
		try {
			String value = getStringUIParameterValue(PARAM_NAMES);

			String[] astr = value.split(",");
			int maxind = NUM_POS > astr.length ? astr.length : NUM_POS;

			JToggleButton[] buttons = {tglbtnFilter,tglbtnFilter_1,tglbtnFilter_2,
        				tglbtnFilter_3,tglbtnFilter_4,tglbtnFilter_5};
			for(int i=0;i<maxind;i++) {
				buttons[i].setText(astr[i]);
			}

		} catch (UnknownUIParameterException e) {
			e.printStackTrace();
		}
	} else if(PARAM_COLORS.equals(parameter)){
		try {
			String value = getStringUIParameterValue(PARAM_COLORS);

        	String[] astr = value.split(",");
			int maxind = NUM_POS > astr.length ? astr.length : NUM_POS;

			JToggleButton[] buttons = {tglbtnFilter,tglbtnFilter_1,tglbtnFilter_2,
                                       tglbtnFilter_3,tglbtnFilter_4,tglbtnFilter_5};
			for(int i=0;i<maxind;i++) {
				buttons[i].setForeground(ColorRepository.getColor(astr[i]));
			}
		} catch (UnknownUIParameterException e) {
			e.printStackTrace();
		}
	}
}
We also need to set the effect of the user interaction with the button group. Here again, EMU provides a static method to do exactly what we want:
@Override
protected void addComponentListeners() {
	SwingUIListeners.addActionListenerOnSelectedIndex(this, FW_POSITION, buttonGroup);
}
Finally, we need to give a description of the panel:
@Override
public String getDescription() {
	return "A panel controlling a FilterWheel with 6 positions.";
}
Note: you can go more in details in the description, for instance describing the intended use of the properties and parameters.
E - Exporting the compiled ConfigurablePanels
Note: This is only useful for old versions of Eclipse and of the WindowBuilder.
24) In order to assemble the panels, we need to compile them and export them as a .jar. Right-click on the project and select Export. In Java, make sure “JAR file” is selected and click on Next. Choose the path (e.g. in the project folder) and click on Finish. The jar file should appear in the Eclipse package explorer.
F - Assembling the ConfigurableMainFrame
25) Right click on your package (here “com.myname.myui”) and select “new -> other”. In the pop-up, select “WindowBuilder/Swing Designer/JFrame”. Click next and, in the superclass field , select “ConfigurableMainFrame”. Click on finish.
26) Use the eclipse suggestion to add all unimplemented methods. Then, add a call to the superconstructor on the generated constructor and comment out the setDefaultCloseOperation line. Then, create another constructor:
public MyFrame() {
	super("",null,null); // calls superconstructor
	setBounds(100, 100, 450, 400);
}

public MyFrame(String arg0, SystemController arg1, TreeMap<String, String> arg2) {
	super(arg0, arg1, arg2);
}
Fix the imports of SystemController and TreeMap.
27) Go to the Design tab. In “System”, click on “Choose component”. Search for your laser panel. Do the same for the filter panel. They should appear in the “Custom” folder at the bottom of the palette.
Note: If “Choose component” doesn’t appear, you can try to follow E and right-click in the palette and import the .jar.
28) Let’s now add 4 lasers and one filter wheel.
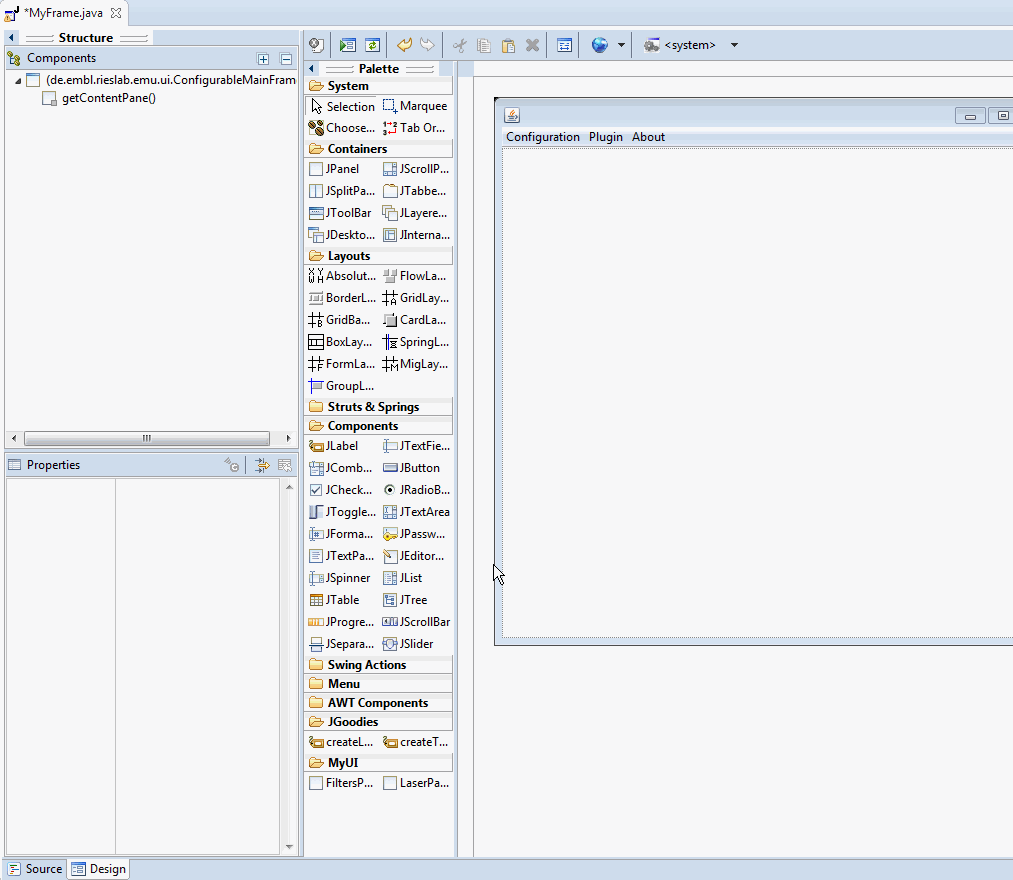
- Add an AbsoluteLayout to the Frame.
- Add a JPanel to the frame’s content.
- Set the layout of the JPanel to GridLayout.
- Add a LaserPanel to the left of the JPanel. An error will be displayed as the LaserPanel constructor expects a String parameter. Navigate to the Properties section, under Constructor, set the label parameter to “Laser0”.
- Repeat for three more lasers, each type selecting the JPanel in the Components section to start with and placing the LaserPanel to the right (a red line should appear). Give them different names (e.g.: Laser1, Laser2 …etc…)
- Resize the JPanel and the frame window to fit the lasers.
- Add a FiltersPanel to the bottom of the frame’s content. Set its label parameter to “Filters”.
- Resize for aesthetic purposes.
29) Back to the Source tab, if Eclipse added all the code in the constructor, then you need to move it to the initComponents() method. The constructors should look like the following:
	/**
	 * Create the frame.
	 */
  public MyFrame() {
    super("",null,null); // calls superconstructor
    setBounds(100, 100, 450, 400);
  }

	public MyFrame(String arg0, SystemController arg1, TreeMap<String, String> arg2) {
		super(arg0, arg1, arg2);
	}
And the initComponents() something along these lines:
@Override
protected void initComponents() {
  setBounds(100, 100, 450, 400);
  getContentPane().setLayout(null);

  JPanel panel = new JPanel();
  panel.setBounds(0, 0, 434, 268);
  getContentPane().add(panel);
  panel.setLayout(new GridLayout(1, 0, 0, 0));

  LaserPanel laserPanel = new LaserPanel("Laser0");
  panel.add(laserPanel);

  LaserPanel laserPanel_1 = new LaserPanel("Laser1");
  panel.add(laserPanel_1);

  LaserPanel laserPanel_2 = new LaserPanel("Laser2");
  panel.add(laserPanel_2);

  LaserPanel laserPanel_3 = new LaserPanel("Laser3");
  panel.add(laserPanel_3);

  FilterPanel filterPanel = new FilterPanel("Filters");
  filterPanel.setBounds(0, 275, 434, 53);
  getContentPane().add(filterPanel);
}
If you have multiple initComponents(), simply delete the empty one and make sure that the remaining ones resemble the one above.
30) Implement the getDefaultPluginSettings() method by returning an empty HashMap and the getPluginInfo() method by returning a description for your plugin:
@Override
public HashMap<String, Setting> getDefaultPluginSettings() {
	HashMap<String, Setting>  settgs = new HashMap<String, Setting>();
	return settgs;
}

@Override
protected String getPluginInfo() {
	return "Description of the plugin and mention of the author.";
}
G - Creating the EMU plugin
31) Right-click on your package and create a new class. Name it “MyPlugin” and, in Interfaces, add UIPlugin. Click OK.
32) Replace the return statements in the class’ methods as follows:
public class MyPlugin implements UIPlugin {
	@Override
	public ConfigurableMainFrame getMainFrame(SystemController arg0,
                                              TreeMap<String, String> arg1) {
		return new MyFrame("MyUI", arg0, arg1);
	}

	@Override
	public String getName() {
		return "MyUI";
	}
}
Note that we are returning the MyFrame using the constructor that was not generated by the WindowBuilder.
33) In order for EMU to find our new plugin, we need to create a file in a very specific place and manner. Right-click on your project and create a new source folder. As folder name, enter “src/main/resources”. Create a new folder in the resources source (right-click directly on it) and name it “META-INF/services”. Finally, in services, create a new file and name it “de.embl.rieslab.emu.plugin.UIPlugin”. In the file, write the path to your UIPlugin, e.g.:
com.myname.myui.MyPlugin
The package explorer should look as follows:
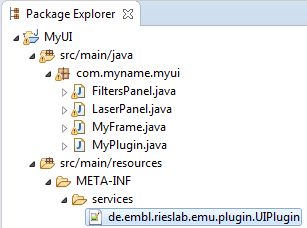
Note: any deviation from the correct folder or the correct UIPlugin paths will prevent EMU from finding the plugin.
H - Exporting and loading in EMU
34) Right-click on your project and select Export. Make sure JAR file is selected and click on Next. Uncheck MyUI.jar and set the export destination to the EMU folder in Micro-Manager (this folder is created when starting EMU within Micro-Manager).
Note: Make sure to have selected the project and not one of the source folders (src/main/java or src/main/resources) before exporting the jar.
35) Start Micro-Manager and click on Plugins/Interface/EMU. By loading your plugin (either through the initial pop-up or by selecting Configurations/Switch Configurations/MyUi), you will be prompted with the configuration wizard. There, you can link your UIProperties to Micro-Manager device properties or set the UIParameters such as the colors and names of the lasers and filters. Save a configuration and you are ready to use your UI.
Note: If your UI is not recognized, then check 33) and 34).
I - Debugging with Eclipse
In order to debug the import into EMU or the operation of the panels, you need to import all jars necessary to start Micro-Manager from Eclipse:
-
Right-click on your project and select Properties.
-
In Java Build Path, click on Libraries and then Add External JARs. Navigate to your Micro-Manager folder and add the ij.jar.
-
Click again on Add External JARs, and this time go to Micro-Manager/plugins/Micro-Manager and add all the jars.
-
Apply the new build paths.
-
Then, in the Run/Debug Settings section (left side), create a new Configuration. Select Java application. Name your configuration. In Main class, select ImageJ - IJ. Finally, in Arguments, set the working directory to other, and point to your Micro-Manager folder. Apply, then OK.
-
Apply and close.
-
You can then, by right-clicking on your project or selecting the small arrow next to the run button in the menu bar, click on “Run Configurations…” and select your newly created configuration.
-
Next time, the run button should also kick-start your configuration directly.
-
Running Micro-Manager from Eclipse allows you to have access to the live console output, see exceptions and at what line in your code they occur/originate from. You have also access to the Eclipse debugger, allowing you to place breakpoints in your code and halt the processes there to inspect variable values.
Note that if you have the Frame class selected the run configuration button might just show your UI outside Micro-Manager. Make sure your run the correct configuration.
J - Going further
Bonus: Optional panel
Using plugin settings, we could make the FiltersPanel optional. First, add a String in MyFrame:
public class MyFrame extends ConfigurableMainFrame {
	public final String SETTING_USE_FW = "Use FW";

	[...]
Then, modify the plugin settings method:
@Override
public HashMap<String, Setting> getDefaultPluginSettings() {
	HashMap<String, Setting> settgs = new HashMap<String, Setting>();
	settgs.put(SETTING_USE_FW, new BoolSetting(SETTING_USE_FW,
                                   "Enable/disable filter wheel panel", true));
	return settgs;
}
And in the initComponents() method, add an If statement around the FiltersPanel call:
if(((BoolSetting) this.getCurrentPluginSettings().get(SETTING_USE_FW)).getValue()) {
	FiltersPanel filtersPanel = new FiltersPanel("Filters");
	filtersPanel.setBounds(10, 297, 474, 54);
	getContentPane().add(filtersPanel);
}
Percentages of a device property
Not all lasers have a percentage device property, for instance many offer a power (mW) set-point instead. How to reconcile this with our power percetage slider? The answer is using a RescaledUIProperty.
In the initializeUIProperties() method:
addUIProperty(new RescaledUIProperty(this, property1, text, new LaserFlag()));
Other parameters or panels
- StringUIParameter for the title of the FiltersPanel.
- An IntSetting for the number of LaserPanels.
- More FiltersPanel (e.g.: for dual channel)